
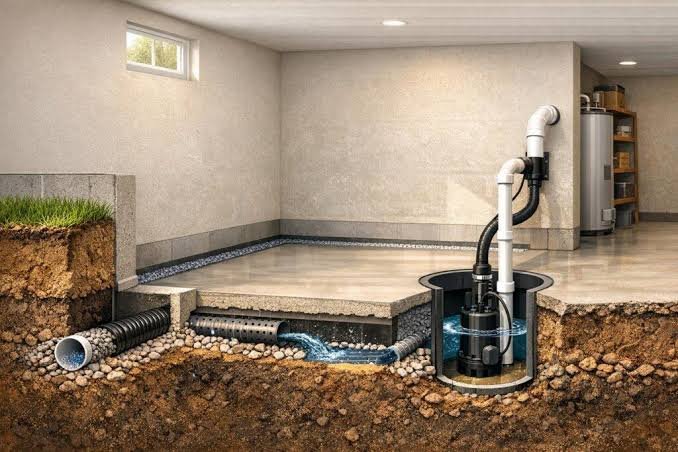
A sump pump is one of those basement features you usually want working quietly in the background—not sitting in the middle of an otherwise beautiful renovation. But covering it up completely or building around it without planning can make future maintenance difficult and may interfere with the pump’s operation.
The best sump pump renovation ideas treat the pump as an important part of the basement rather than an eyesore to hide. You can make the area look finished with a neat cover, built-in storage, decorative flooring, a small utility enclosure, or thoughtful furniture placement while keeping the pump accessible.
This guide explains practical ways to renovate around a sump pump, what you should never cover or block, and how to combine appearance with reliable water protection.
What Is a Sump Pump and Why Does It Matter During a Renovation?
A sump pump sits in a sump basin or pit and removes water that collects there. These systems are commonly used in basements where groundwater or drainage water could otherwise cause flooding.
That makes the sump pump more than a mechanical appliance. It is part of the basement’s water-management system.
During renovation, the goal should be:
- Keep the pump accessible.
- Keep the discharge pipe unobstructed.
- Avoid blocking the float or pump controls.
- Leave enough room for inspection and replacement.
- Protect electrical connections from water.
- Make the finished area look intentional.
A good renovation hides the visual clutter, not the pump’s ability to do its job.
15 Sump Pump Renovation Ideas for a Better-Looking Basement
1. Install a Removable Decorative Sump Pump Cover
One of the simplest solutions is a properly fitted cover.
Instead of leaving the basin exposed, use a removable cover that suits the basement design. A clean, flat cover can visually disappear beneath furniture or beside finished flooring.
Choose a design that can be removed without dismantling walls or cabinets.
For a modern basement, a simple neutral cover can blend with the floor. In a traditional room, a wood-toned finish may make the utility area feel more intentional.
Important: Do not permanently seal or bury the sump basin just to improve its appearance. The pump and basin may need inspection or servicing later.
2. Create a Small Utility Closet
If the sump pump sits in an awkward corner, consider creating a small utility enclosure around it.
The enclosure can contain:
- The sump basin
- Discharge plumbing
- Backup equipment
- Shutoff components, where applicable
- Electrical equipment that is appropriately installed
- Maintenance supplies
Use a door or removable access panel rather than a permanently sealed wall.
This approach works particularly well when the sump pump is near other mechanical equipment such as a water heater or furnace.
The result is a dedicated utility zone rather than a collection of pipes and equipment scattered around the basement.
3. Build a Removable Bench Around the Area
A built-in bench can disguise an unattractive sump-pump location while providing useful seating.
The key word is removable.
Instead of constructing a heavy permanent structure over the basin, design the bench so an access panel or section can be removed when the pump needs attention.
This can work especially well in:
- Basement family rooms
- Playrooms
- Home offices
- Entertainment areas
- Guest spaces
The bench should never prevent the pump from being reached quickly.
4. Use a False Wall With an Access Panel
A shallow false wall can hide pipes and make a basement look more finished.
For example, you might build a narrow service wall along one side of the basement and incorporate the sump-pump equipment into it.
Add a discreet access door or panel finished to match the wall.
This is especially useful when exposed plumbing is the main visual problem rather than the sump basin itself.
Before building the wall, make sure the entire service area remains accessible.
5. Turn the Corner Into a Designed Utility Zone
Sometimes you don’t need to hide the sump pump at all.
Instead, make the entire corner look intentional.
Try:
- Matching wall paint
- Neat pipe routing
- A clean pump cover
- Simple shelving
- A small utility cabinet
- Good lighting
- A washable floor surface
Rather than pretending the equipment isn’t there, the design tells the eye that this is a purposeful utility area.
This can be one of the least expensive approaches because it avoids major construction.
6. Use Floating Shelves Nearby
Floating shelves can make use of otherwise wasted wall space around a sump pump.
Keep the shelves beside the equipment rather than directly over components that need servicing.
You can use them for:
- Towels
- Cleaning supplies
- Storage baskets
- Seasonal items
- Decorative objects
Avoid storing valuable or water-sensitive belongings immediately beside the sump basin.
7. Create a Compact Laundry or Utility Area
If your sump pump is already located near plumbing, a renovation may be a good opportunity to organize the entire area as a utility zone.
A compact laundry setup, utility sink, storage cabinet, or cleaning station can make the sump pump feel like part of a larger functional space.
However, don’t assume that because two plumbing systems are nearby they can simply be connected. Drainage and wastewater arrangements need to follow the applicable local requirements.
8. Match the Flooring Around the Sump
Flooring can make a surprisingly large difference.
If the sump pump is surrounded by unfinished concrete, consider a finished basement floor that visually integrates the area.
Possible approaches include:
- Luxury vinyl flooring
- Tile
- Sealed concrete
- Other moisture-appropriate basement flooring
The exact choice depends on the basement’s moisture conditions and the manufacturer’s installation requirements.
Most importantly, don’t install flooring in a way that prevents access to the sump basin.
A removable or neatly cut access area is much more practical than covering the entire system permanently.
9. Use a Small Raised Platform for the Living Area
If the sump pump is located near one side of the room, a carefully planned raised platform can visually separate the finished living area from the utility zone.
For example, a basement media room could have a slightly raised seating area while the sump remains in an accessible utility corner.
This idea requires more planning than simply installing a cover because the renovation must account for:
- Headroom
- Flooring transitions
- Access
- Moisture
- Structural considerations
- Plumbing and electrical routes
Don’t build a platform over the sump pit simply to make the floor level.
10. Add a Decorative Screen
A decorative screen is a flexible option when you want to hide the pump visually without constructing walls.
Ideas include:
- Slatted wood screens
- Decorative metal panels
- Freestanding room dividers
- Simple painted panels
- Open shelving
An open or removable screen is generally more practical than a sealed box because it can provide visual separation while preserving access.
It is also easy to change if your basement layout changes later.
11. Make the Sump Area Part of a Storage Wall
A full storage wall can make an awkward sump-pump corner disappear into the overall design.
Use cabinets or shelving around—not directly over—the service area.
A useful layout might include:
Tall storage + open service zone + sump pump + lower cabinets
This creates visual balance while leaving the critical equipment reachable.
Avoid storing heavy boxes where they would have to be moved during an emergency.
12. Add Better Lighting
Sometimes the sump pump looks worse simply because it sits in a dark corner.
A small amount of lighting can make the space cleaner and easier to inspect.
Consider:
- LED ceiling lighting
- Motion-activated utility lighting
- Under-shelf lighting
- A dedicated light near the service area
Good lighting isn’t only decorative. It also makes it easier to notice standing water, leaks, damaged pipes, or other problems.
13. Upgrade the Pump Area While Renovating
A renovation is a convenient time to evaluate the sump system itself.
Instead of spending the entire budget on cosmetic changes, inspect:
- Pump condition
- Basin condition
- Discharge piping
- Check valve
- Float operation
- Backup arrangements
- Electrical setup
- Accessibility
A sump pump’s job is to remove collected water from the basin, so the drainage and discharge arrangement are just as important as making the pump look attractive.
If any part of the system appears questionable, have a qualified professional evaluate it before closing the area behind walls or cabinets.
14. Add a Backup Pump or Backup Power Strategy
A finished basement can contain furniture, electronics, flooring, drywall, and other materials that are expensive to replace.
That makes backup planning worth considering, particularly in areas where power outages and heavy rain can coincide.
Depending on the system and local conditions, homeowners may consider:
- A secondary pump
- Battery backup
- A backup power system
- A water-powered backup system where appropriate
- A high-water alarm
The correct option depends on the home, pump system, available utilities, and local requirements.
Don’t install a backup device simply because it fits the space. It needs to be compatible with the existing drainage system and sized appropriately.
15. Design a Hidden-but-Accessible Maintenance Hatch
For homeowners who want the cleanest appearance, a flush maintenance hatch can be an excellent compromise.
The hatch can be finished to match:
- Flooring
- Tile
- A platform
- A cabinet
- A wall
When closed, it looks like part of the room. When opened, it provides access to the sump.
This approach works particularly well in carefully designed finished basements because it acknowledges a basic reality: mechanical equipment eventually needs maintenance.
How to Hide a Sump Pump Without Creating a Problem
The biggest renovation mistake is treating the sump pump like something that can simply be covered permanently.
A sump area should remain accessible because pumps, floats, discharge connections, check valves, and electrical components may need inspection or repair.
Before hiding the equipment, ask these five questions:
| Question | Why it matters |
|---|---|
| Can I reach the pump easily? | Repairs should not require demolition. |
| Can I see or access the basin? | Water levels and pump operation may need checking. |
| Can the discharge pipe be inspected? | Blockages or leaks can affect drainage. |
| Can the pump be removed? | Pumps eventually may need replacement. |
| Can the area remain dry and safe? | Moisture and electrical equipment require careful planning. |
If the answer to any of these is “no,” the design probably needs another look.
Should You Put Furniture Over a Sump Pump?
It depends on the furniture and the location of the sump.
A lightweight, movable piece of furniture may be workable if it does not block access.
Permanent furniture is more problematic.
For example, a built-in cabinet directly over a sump basin could make a future pump replacement unnecessarily difficult. A removable cabinet section or adjacent storage unit is a better approach.
Think about the future repair path, not just how the room looks on renovation day.
Best Flooring Choices Around a Sump Pump
There isn’t one universal best flooring material for every basement.
The more important question is whether the flooring is appropriate for the basement’s moisture conditions.
Vinyl Flooring
Vinyl can provide a clean finished appearance and is commonly considered for basement renovations. Installation details still matter, especially around floor penetrations and the sump access point.
Tile
Tile can be a practical choice where moisture resistance and easy cleaning are priorities. It can also make the sump area visually blend with the rest of the floor.
Sealed Concrete
If you prefer an industrial or minimalist basement, finished concrete can be attractive without requiring elaborate flooring.
Carpet
Carpet can make a basement feel warm and comfortable, but the potential for water exposure should be considered carefully when a sump system is present.
Whatever material you choose, don’t sacrifice access to the sump just to create a seamless-looking floor.
How to Make a Sump Pump Area Look More Expensive
You don’t necessarily need an expensive construction project.
Small details often create the biggest visual improvement:
- Paint exposed walls and pipes where appropriate.
- Use a clean, properly fitted sump cover.
- Organize cables and visible plumbing professionally.
- Add a small amount of lighting.
- Use matching storage containers.
- Keep the area free of clutter.
- Coordinate nearby flooring and wall finishes.
- Use a removable screen or access panel.
- Keep maintenance equipment neatly stored nearby.
- Make the utility area look intentional.
The goal is a neat service area—not an elaborate disguise that makes maintenance difficult.
Sump Pump Renovation Ideas for Small Basements
Small basements require a slightly different approach.
You may not have enough room for a dedicated utility closet or large storage wall. Instead, use compact solutions.
Try a slim utility cabinet
A narrow cabinet can conceal supplies while leaving the sump itself accessible.
Use vertical storage
Wall-mounted shelving takes advantage of unused wall space without consuming valuable floor area.
Choose a removable screen
A lightweight screen can hide the pump when needed and be moved quickly during maintenance.
Integrate the pump into a corner
Use matching finishes around the area so the pump doesn’t look like an isolated mechanical feature.
Keep circulation paths clear
Don’t sacrifice walking space simply to hide the equipment. In a small basement, easy access may be more valuable than perfect visual concealment.
Sump Pump Ideas for a Finished Basement
A finished basement needs a different mindset from an unfinished utility room.
Once drywall, flooring, furniture, and decorative finishes are installed, access becomes more important.
A good finished-basement design can place the sump:
Behind a removable access panel → inside a dedicated utility zone → beside storage → near other mechanical equipment
This keeps the visual design clean while maintaining a practical service route.
Before finishing walls, also think about what happens if the pump fails. The EPA emphasizes that controlling moisture is central to preventing indoor mold growth, so basement renovation should address moisture rather than merely hiding evidence of it.
Mistakes to Avoid During a Sump Pump Renovation
Permanently covering the basin
A beautiful floor is not worth making the sump impossible to reach.
Building cabinets directly over the pump
This can turn a simple repair into a much larger project.
Blocking the discharge pipe
The discharge route is essential to the pump’s purpose. Keep it accessible and avoid creating a renovation that restricts or damages it.
Ignoring the electrical setup
Basements combine moisture and electrical equipment, so electrical work should comply with the applicable local electrical requirements. In the U.S., requirements can depend on the adopted electrical code and local jurisdiction; in the UK, applicable electrical and building requirements should be checked locally.
Storing valuable items beside the sump
Even a functioning system does not eliminate every possibility of water intrusion or equipment failure.
Renovating before fixing moisture problems
Paint, flooring, furniture, and drywall cannot solve an underlying water problem.
If the basement regularly smells damp, shows staining, develops mold, or experiences water intrusion, address the moisture source rather than simply covering the symptoms. The U.S. Environmental Protection Agency notes that controlling moisture is the key to controlling mold growth.
A Simple Planning Checklist
Before construction begins, walk through this checklist.
Sump pump
- Pump is working correctly.
- Float moves freely.
- Basin is accessible.
- Pump can be removed if replacement becomes necessary.
- Discharge piping is accessible.
- Backup arrangements have been considered.
Renovation
- Flooring does not permanently block the basin.
- Cabinets do not trap the pump.
- Access panels can actually be opened.
- Furniture can be moved if necessary.
- Pipes aren’t damaged by the new construction.
- Lighting makes the area easy to inspect.
Moisture control
- Existing water problems have been investigated.
- Damp materials have been addressed.
- Any mold or moisture problem has been dealt with appropriately.
- The renovation isn’t hiding an unresolved leak.
Safety
- Electrical work is compliant with local requirements.
- Wet-area risks have been considered.
- Professionals are used where plumbing, electrical, structural, or drainage work requires specialist knowledge.
What Is the Best Sump Pump Renovation Idea?
For most finished basements, the most practical approach is a removable, attractive access solution combined with organized storage and moisture-appropriate finishes.
If the sump is in a corner, a small utility enclosure or decorative screen can work well. If it sits in the middle of a finished room, a flush removable access panel may be more appropriate.
The right design depends on the pump’s location, the basement layout, how frequently the system operates, and how much access is needed.
The guiding rule is simple:
Make the sump pump less noticeable, but never make it inaccessible.
Frequently Asked Questions
Can I cover a sump pump during a basement renovation?
You can improve its appearance with a suitable removable cover or enclosure, but you should not permanently block access to the basin, pump, controls, or plumbing.
Can I put flooring over a sump pump?
Flooring can be installed around a sump area, but the finished design should preserve access to the basin and pump. A removable access panel can provide a cleaner appearance without sacrificing serviceability.
How can I hide sump pump pipes?
A utility wall, removable cabinet panel, decorative screen, or carefully planned storage area can conceal visible pipes. Make sure the piping remains accessible and is not damaged or restricted by the renovation.
Should a sump pump have a cover?
A suitable cover can improve appearance and help separate the sump from the living area, but the cover should be appropriate for the basin and allow required access. Don’t improvise a permanent cover that interferes with pump operation or maintenance.
Is it worth adding backup protection during a renovation?
It can be, especially when the basement contains finished materials or valuable belongings. Options include a secondary pump or backup power, but the appropriate solution depends on the existing system and local conditions.
Can I build a cabinet around my sump pump?
Yes, but design the cabinet so the pump and basin remain accessible. A removable panel is much more practical than a permanent cabinet that has to be dismantled for servicing.
Conclusion
A sump pump doesn’t have to ruin the look of a finished basement. With the right design, it can become a quiet, organized part of the room rather than an awkward mechanical feature.
The most useful sump pump renovation ideas focus on removable covers, utility enclosures, decorative screens, thoughtful storage, suitable flooring, better lighting, and reliable backup planning.
Before choosing the prettiest option, think about the day the pump needs to be inspected or replaced. If a contractor can access the equipment without tearing apart your renovation, you’ve probably found the right balance between appearance and practicality.