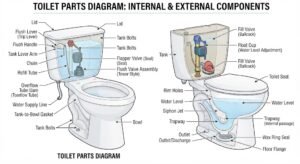

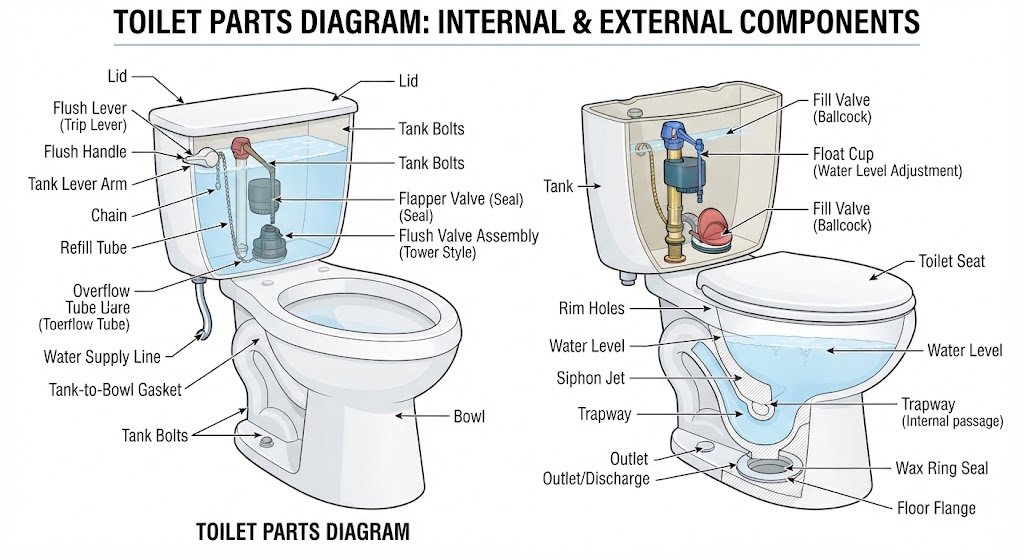
A toilet parts diagram makes it much easier to understand what is happening inside and underneath your toilet. What looks like one simple bathroom fixture is actually a collection of valves, seals, levers, pipes, and fittings that work together to flush waste and refill the bowl.
The basic system is straightforward: pressing the handle or flush button opens the flush mechanism, water leaves the tank and enters the bowl, waste travels through the trapway and drain, and the fill valve then restores the tank’s water level. Different toilets use different components, so not every model will have exactly the same internal parts. Manufacturers, for example, use both traditional flapper-style and canister-style flush valves.
This guide breaks down the main toilet parts, explains what each one does, shows where the parts are located, and helps you connect common toilet problems with the component that may be responsible.
Toilet Parts Diagram: The Main Components
A standard two-piece toilet can be divided into two major areas: the tank and the bowl. There are also important parts underneath the toilet that connect it to the home’s water supply and drainage system.
Here is a simplified breakdown:
| Part | Where it is | What it does |
|---|---|---|
| Toilet tank | Above the bowl | Stores water for flushing |
| Tank lid | Top of tank | Covers and protects tank components |
| Flush handle or button | Tank exterior | Starts the flushing process |
| Trip lever | Inside tank | Transfers movement from the handle |
| Flush valve | Bottom of tank | Releases tank water into the bowl |
| Flapper or canister seal | At flush valve | Controls the opening and closing of the flush outlet |
| Overflow tube | Inside tank | Helps prevent the tank from overflowing |
| Fill valve | Inside tank | Refills the tank after flushing |
| Float | Attached to fill valve | Helps control the tank’s water level |
| Refill tube | Inside tank | Sends refill water toward the bowl |
| Toilet bowl | Lower fixture | Holds water and receives waste |
| Rim holes | Under bowl rim | Direct flush water around the bowl |
| Trapway | Inside bowl/base | Carries waste toward the drain |
| Closet flange | Floor connection | Connects toilet to the drain pipe |
| Wax ring or sealing gasket | Under toilet | Seals the toilet-to-drain connection |
| Supply line | Outside toilet | Carries fresh water to the tank |
| Shutoff valve | Wall/floor near toilet | Turns the toilet’s water supply on or off |
| Mounting bolts | Base of toilet | Secure the toilet to the flange |
The exact arrangement varies by toilet design. Manufacturer service diagrams can contain additional washers, gaskets, locknuts, clips, and other model-specific components.
Parts Inside the Toilet Tank
The tank contains most of the mechanical parts that control a traditional flush. If your toilet is constantly running, does not refill properly, or has a weak flush, this is usually the first place to look.
1. Toilet Tank
The tank is the reservoir mounted above the bowl on a conventional two-piece toilet.
Its primary job is to hold the water needed for a flush. When you activate the flush mechanism, the stored water is released into the bowl.
Not every toilet has a separate tank. One-piece toilets combine the tank and bowl into a single fixture, while some modern toilets use concealed or in-wall tanks.
2. Tank Lid
The tank lid covers the opening at the top of the tank.
It protects the internal components from accidental contact and gives the toilet a finished appearance. Some lids also have model-specific clips or hardware, so avoid assuming that every lid is interchangeable.
3. Flush Handle or Button
The flush handle is the part you normally touch to start a flush on a traditional toilet.
Push-button toilets use a different external control, but the basic purpose is the same: activate the flushing mechanism.
A handle is connected to a trip lever inside the tank.
4. Trip Lever
The trip lever transfers movement from the external handle to the flush valve or flapper assembly.
On a traditional flapper-style toilet, the lever commonly lifts the flapper through a chain or similar connection. If the connection is loose, tangled, or improperly adjusted, the toilet may fail to flush correctly or may continue running.
5. Flush Valve
The flush valve is the opening at the bottom of the tank that allows water to move into the bowl.
When the toilet is flushed, the valve opens. After the flush, its seal closes so the tank can refill.
Flush valves are not all identical. Some toilets use a flapper-style design, while others use a canister-style valve.
This distinction matters when buying replacement parts.
6. Flapper
A flapper is a flexible sealing component used on many conventional toilet flush valves.
When you flush, the flapper lifts and allows water to leave the tank. Once the flush is complete, it drops back into position and seals the opening.
A worn, dirty, damaged, or poorly seated flapper can allow water to leak continuously from the tank into the bowl.
7. Canister Seal
A canister-style flush valve performs the same basic job as a flapper system but uses a different mechanism.
Instead of a traditional rubber flapper, the system uses a canister and sealing component to control the opening.
This is one reason it is better to identify the toilet’s actual mechanism before purchasing a replacement part.
8. Overflow Tube
The overflow tube is part of the flush valve assembly and extends upward inside the tank.
It provides a route for excess water if the tank water rises too high. The overflow system is therefore an important part of the toilet’s water-level control.
If water is continuously flowing into the overflow, the fill valve or water-level adjustment may need attention.
9. Fill Valve
The fill valve controls the flow of fresh water into the tank after a flush.
Once the tank reaches the appropriate level, the fill valve stops allowing water to enter. Modern toilets can use several different fill-valve designs, so replacement parts should be matched to the toilet.
10. Float
The float works with the fill valve to help control the tank’s water level.
Depending on the toilet, the float may be a ball, float cup, or another design integrated with the fill valve.
As the tank fills, the float rises. Once the required level is reached, the fill valve shuts off.
11. Refill Tube
The refill tube is a small flexible tube connected to the fill valve.
It directs a controlled amount of water toward the bowl during the refill cycle. On many designs, it clips near the overflow tube.
The tube must be positioned correctly rather than simply left loose inside the tank.
Parts of the Toilet Bowl
The bowl is more than a container for water. Its shape and internal passages help direct water and waste during a flush.
12. Toilet Bowl
The bowl is the large ceramic section beneath the tank.
It contains the standing water, receives waste, and directs material toward the toilet’s internal trapway.
One-piece and two-piece toilets may look different externally, but the bowl performs the same basic functions.
13. Bowl Rim
The rim is the upper edge of the toilet bowl.
Beneath the rim are openings that allow flushing water to enter the bowl on many conventional toilet designs.
The placement and design of these openings vary between models.
14. Rim Holes
Rim holes allow water from the tank to enter the bowl during a flush.
Water flowing through these openings helps wash the bowl and contributes to the flushing action.
Mineral buildup or other obstructions can interfere with water flow through the rim openings and affect flushing performance. Manufacturer troubleshooting guidance identifies blocked rim holes as one possible cause of poor flushing.
15. Trapway
The trapway is the curved internal passage that carries waste and water away from the bowl.
It is usually not visible because it is built into the ceramic body of the toilet.
A blockage in the trapway can cause slow drainage, poor flushing, or repeated clogging.
16. Water Spot
The water spot is the visible area of standing water inside the bowl.
Its size and shape vary between toilet models. The water also contributes to the toilet’s trap seal, which helps prevent sewer gases from entering the room through the drain.
Parts Under the Toilet
Several important components are hidden below or behind the toilet.
17. Closet Flange
The closet flange, also called a toilet flange, connects the toilet to the drain pipe beneath the floor.
It also provides the mounting points used to secure the toilet.
The flange needs to be properly positioned and secured because it is part of both the structural and drainage connection.
18. Wax Ring or Sealing Gasket
A wax ring or another approved sealing gasket sits between the toilet outlet and the drain connection.
Its job is to create a watertight seal at the base of the toilet.
Installation methods vary by product, and some modern toilets use specialized sealing systems instead of a traditional wax ring. American Standard installation instructions, for example, specify a wax ring for certain toilet installations.
19. Mounting Bolts
Mounting bolts, often called closet bolts or T-bolts, pass through the toilet flange and secure the toilet to the floor.
The toilet should be tightened securely, but excessive tightening can damage the ceramic fixture.
20. Bolt Caps
Small decorative caps can cover the exposed mounting nuts and bolts at the toilet base.
They are primarily a finishing component rather than part of the flushing mechanism.
Water Supply Parts
The toilet also needs a connection to the home’s clean-water supply.
21. Shutoff Valve
The shutoff valve is normally located on the wall or floor near the toilet.
Turning it off stops water from entering the toilet. This is one of the first things to do before servicing many tank components.
If you need to work on the fill valve, supply connection, or other water-side components, shutting off the supply can help prevent unwanted water flow.
22. Supply Line
The supply line connects the shutoff valve to the toilet’s fill valve.
It carries fresh water into the tank whenever the fill valve opens.
Supply lines come in different configurations, so the replacement should be compatible with both the shutoff valve and toilet connection.
How a Toilet Works From Flush to Refill
Understanding the sequence is often more useful than memorizing a list of parts.
Step 1: You activate the flush
You press the handle or button.
The control mechanism moves the trip lever, lifts the flapper, opens a canister, or activates another flush mechanism.
Step 2: Water leaves the tank
The flush valve opens and water moves rapidly from the tank into the bowl.
This sudden flow creates the flushing action.
Step 3: Water moves through the bowl
Water enters through the toilet’s designed passages and washes through the bowl.
The bowl’s internal geometry directs the water and waste toward the trapway.
Step 4: Waste enters the drain
The combination of water and waste travels through the trapway and into the building’s drainage system.
Step 5: The flush valve closes
Once the flush cycle is complete, the flapper or other sealing mechanism returns to its closed position.
A proper seal allows the tank to refill without continuously leaking water into the bowl.
Step 6: The fill valve opens
Fresh water enters through the supply line and fill valve.
The refill process restores the tank’s water level and also supplies the bowl with the water needed to establish its normal water level.
Step 7: The fill valve shuts off
As the tank reaches its intended level, the float or another level-control mechanism causes the fill valve to close.
The toilet is then ready for the next flush.
Toilet Tank Parts Diagram vs. Bowl Parts
If you are trying to identify a replacement part, first determine whether the problem is inside the tank or below the bowl.
| Area | Common parts | Typical issues |
|---|---|---|
| Tank | Fill valve, float, flush valve, flapper, trip lever | Running, weak refill, incomplete flush |
| Bowl | Rim, water spot, trapway | Poor wash, clogging, slow drainage |
| Base | Flange, seal, mounting bolts | Movement or leakage around the base |
| Supply | Shutoff valve, supply line | Water leaks or no water entering tank |
This simple division can save time when diagnosing a problem.
Common Toilet Problems and the Parts to Check
Toilet Keeps Running
Start by checking the flapper or canister seal, fill valve, water level, and overflow tube.
A worn seal can allow tank water to escape into the bowl. A water level that is too high can also cause water to enter the overflow. Kohler’s troubleshooting guidance identifies these as common causes of an occasionally running toilet.
Toilet Does Not Flush
Check whether the handle or button is properly connected to the flushing mechanism.
On a traditional toilet, inspect the trip lever, chain, and flapper. A disconnected or incorrectly adjusted chain can prevent the flush valve from opening properly.
Toilet Takes Too Long to Fill
Inspect the fill valve, water supply, and supply line.
A partially closed shutoff valve, debris at the fill valve, or a restricted supply can contribute to slow filling. Manufacturer troubleshooting information recommends checking the water supply and fill-valve components when refill times become excessive.
Water Runs Into the Overflow
Check the tank’s water level and fill valve.
If the tank is filling too high, water may flow into the overflow. Correct adjustment depends on the toilet and its fill-valve design.
Water Leaks Around the Toilet Base
Look underneath the toilet and around the floor connection.
A leak at the base can involve the seal between the toilet and drain connection, but water from another location can also travel downward and appear to originate at the base. For that reason, identify the actual source before replacing a seal.
Toilet Is Loose
A loose toilet can indicate a problem with the mounting hardware or flange.
Do not simply keep tightening the nuts. Excessive force can damage the ceramic toilet. If the toilet remains unstable after appropriate adjustment, the flange or floor connection may require inspection.
Toilet Has a Weak Flush
Check the water level, flush mechanism, bowl passages, and trapway.
A partial obstruction in the trapway, jet, or rim holes can affect flushing. Kohler’s troubleshooting information specifically lists obstructions in these areas among possible causes of poor flushing.
Toilet Parts That Commonly Need Replacement
Not every toilet component wears out at the same rate.
Common replacement items include:
- Flapper or canister seal
- Fill valve
- Flush valve
- Trip lever
- Refill tube
- Tank gasket
- Supply line
- Toilet seat hardware
- Wax ring or other base seal
- Mounting hardware
The exact replacement part should match the toilet model and mechanism. Manufacturer parts diagrams can be particularly useful because they show the components associated with a specific toilet rather than assuming that every toilet uses the same parts. Kohler, for example, provides product-specific parts diagrams and recommends identifying the toilet model before selecting replacement components.
How to Identify the Correct Toilet Part
Before buying a replacement, do not rely only on the part’s appearance.
Find the toilet model
Look for the manufacturer’s name and model information on the toilet, product documentation, or other locations specified by the manufacturer.
Kohler’s parts-support system, for example, recommends identifying the product and then using its corresponding parts diagram to select the required component.
Identify the mechanism
Determine whether your toilet uses:
- A flapper-style flush valve
- A canister-style flush valve
- A particular type of fill valve
- A button or handle-operated mechanism
Two parts may look similar while having different dimensions or attachment methods.
Compare the old and replacement parts
Check the connection points, dimensions, seals, threads, and adjustment mechanism.
When in doubt, use the manufacturer’s installation or service documentation rather than assuming a universal replacement will fit.
Toilet Terminology in the UK and USA
Some toilet terminology differs between British and American English.
| UK term | Common US term | Meaning |
|---|---|---|
| Cistern | Tank | Water reservoir used for flushing |
| Flush valve | Flush valve | Controls water leaving the cistern/tank |
| Inlet valve | Fill valve | Controls incoming water |
| Flush button | Flush button | Activates the flush |
| Toilet pan | Toilet bowl | Main ceramic bowl |
| Soil pipe | Drain/waste pipe | Carries wastewater away |
| Toilet seat | Toilet seat | Seat fitted to the bowl |
The exact terminology can vary by manufacturer and region, so product documentation should take priority when ordering parts.
Are Toilet Parts Universal?
No. Some replacement components are designed to fit many toilet models, but toilet parts should not automatically be treated as universal.
Flush valves, fill valves, flappers, seals, handles, tank gaskets, and other components can differ in size, shape, connection method, and operating design.
Even toilets from the same manufacturer can use different components. Manufacturer service documentation shows that toilets can use different fill valves, flush valves, flappers, gaskets, and related hardware.
If you are replacing a part, identifying the toilet model and comparing the manufacturer’s parts information is usually safer than buying based on appearance alone.
What to Check Before Opening the Toilet Tank
If you are investigating a toilet problem, a few simple checks can narrow down the cause.
- Look at the water level. Is it unusually high or low?
- Listen for running water. A constant sound may indicate a leak or refill problem.
- Check the flapper or canister seal. Does it close completely?
- Inspect the chain or trip lever. Is it disconnected or excessively tight?
- Check the fill valve. Does it shut off when the tank reaches its normal level?
- Inspect the supply connection. Look for visible leaks.
- Check the bowl. Look for slow drainage or signs of a blockage.
- Do not overtighten fittings. Plastic and ceramic components can be damaged by excessive force.
For model-specific repairs, follow the manufacturer’s instructions. Component designs and adjustment methods differ between toilets.
A Simple Way to Read a Toilet Parts Diagram
When looking at an exploded manufacturer diagram, work from the outside inward.
Start with the visible controls:
Handle or button → trip lever → chain/linkage
Then look at the flushing mechanism:
Trip lever → flush valve → flapper or canister seal → bowl
Next follow the refill system:
Water supply → shutoff valve → supply line → fill valve → refill tube → tank/bowl
Finally examine the drain connection:
Bowl → trapway → toilet outlet → sealing gasket/wax ring → flange → drain pipe
This sequence helps you understand not only where a component sits, but what role it plays.
When to Call a Plumber
Many simple toilet issues involve accessible components such as a fill valve, flapper, or handle. More complicated problems can involve the toilet flange, drain connection, concealed plumbing, damaged flooring, or persistent leaks.
Consider professional help when:
- The toilet repeatedly leaks from its base.
- The flange appears damaged or improperly positioned.
- The floor around the toilet is wet or damaged.
- A blockage cannot be cleared safely.
- The toilet rocks despite appropriate mounting adjustments.
- A drain or soil-pipe problem is suspected.
- You are unsure whether the water is clean supply water or wastewater.
- A repair requires work beyond the accessible toilet components.
The key is not to keep replacing tank parts when the actual problem is elsewhere in the plumbing system.
Frequently Asked Questions
What are the main parts of a toilet?
The main parts include the tank, flush handle or button, trip lever, flush valve, flapper or canister seal, overflow tube, fill valve, float, refill tube, bowl, trapway, flange, base seal, supply line, and shutoff valve.
What part of a toilet controls the water level?
The fill valve and its associated float or level-control mechanism regulate incoming water and determine when the tank stops filling. Different toilet designs use different fill-valve arrangements.
What causes a toilet to keep running?
Common causes include a leaking flapper or canister seal, an incorrectly adjusted water level, a problem with the fill valve, or water entering the overflow.
What is the difference between a flush valve and a fill valve?
The flush valve controls water leaving the tank during a flush. The fill valve controls fresh water entering the tank afterward.
Where is the toilet trapway?
The trapway is the curved internal passage inside the toilet that carries water and waste from the bowl toward the drain. It is usually hidden within the ceramic body.
How do I know which toilet replacement part I need?
Identify the toilet manufacturer and model, determine which component is installed, and compare it with the manufacturer’s parts diagram or service documentation. This is more reliable than choosing a replacement solely by appearance.
Conclusion
A toilet parts diagram is useful because it turns an unfamiliar fixture into a collection of understandable components. The tank handles the flush and refill cycle, the bowl directs water and waste through the trapway, and the flange and supply connections tie the toilet into the home’s plumbing.
When a toilet develops a problem, identify the part involved before buying a replacement. A running toilet may point toward the flapper, canister seal, fill valve, or water level; a slow flush may involve the bowl, rim passages, trapway, or flush mechanism; and a leak at the base may require attention to the drain connection rather than the tank.
The most important detail is that toilet designs vary. Use the general diagram above to understand how the system works, then use the manufacturer’s model-specific parts diagram when you need to repair or replace a component.